These are instructions on how to convert video to iPhone Format using Kvip and Windows.
Kvip is a utility that converts video files from various formats to a video file that is playable on the iPhone and iPod video (5G/5.5G/6G).
Step One
Download Kvip from here. Save the file to your desktop.
Step Two
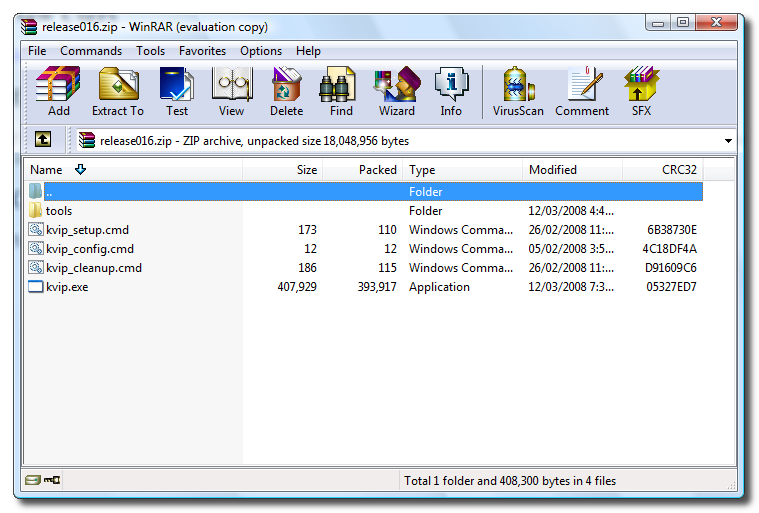
Double click the downloaded zip file (release016.zip) on your desktop to open it in Winrar or similar.
Step Three
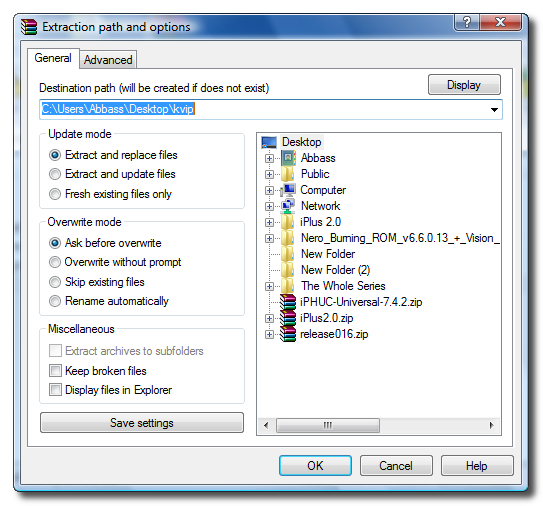
Extract the contents of the file to a location of your choice. In this example I am extracting the files to a folder called kvip on the Desktop.
Step Four
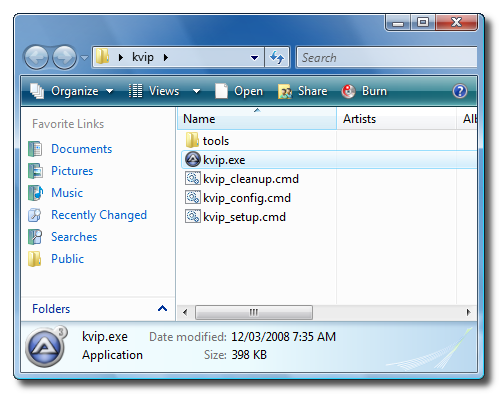
Open the kvip folder you extracted and double click kvip.exe.
Step Five
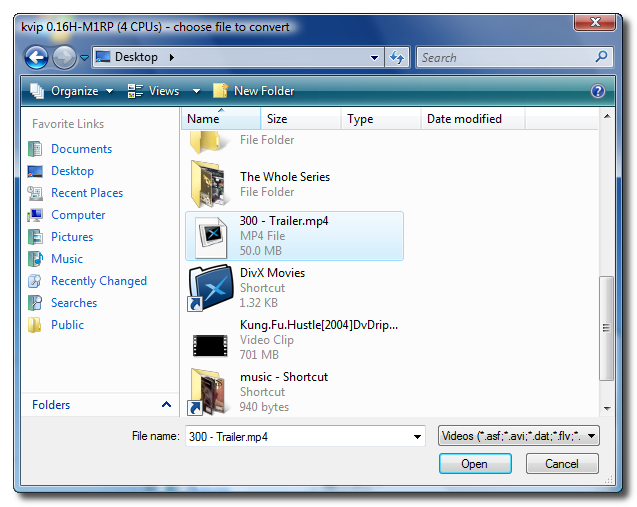
A windows will open asking you to select the file you would like to convert. Do this then click the Open button.
Step Six
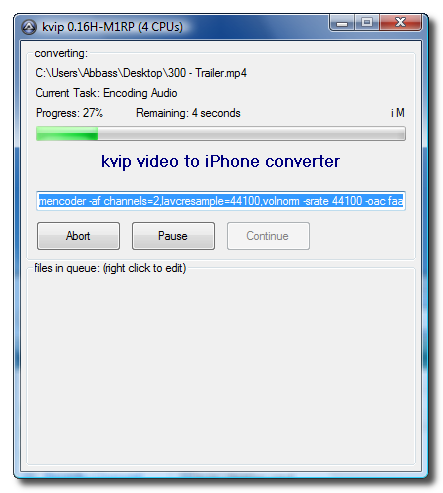
Kvip will then begin to convert your selected video file.
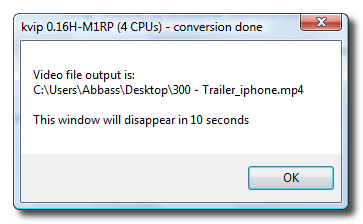
Once finished a dialog will appear and let you know the name and location of your newly converted video file.
Step Seven
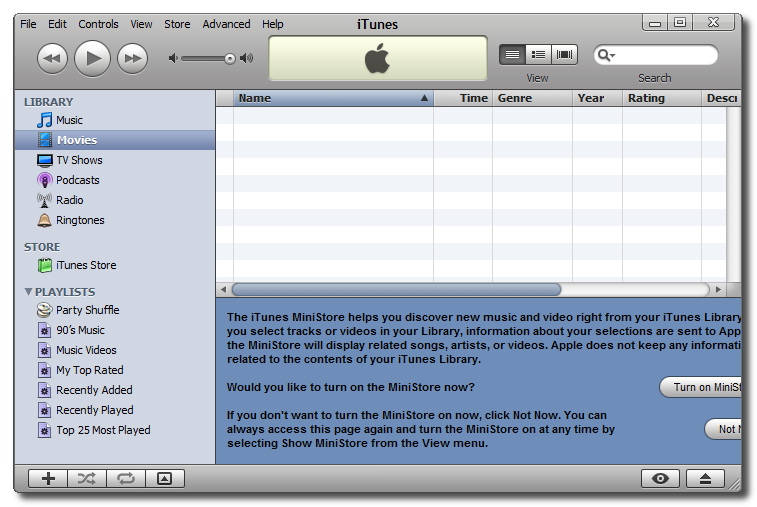
Launch iTunes.
Step Eight
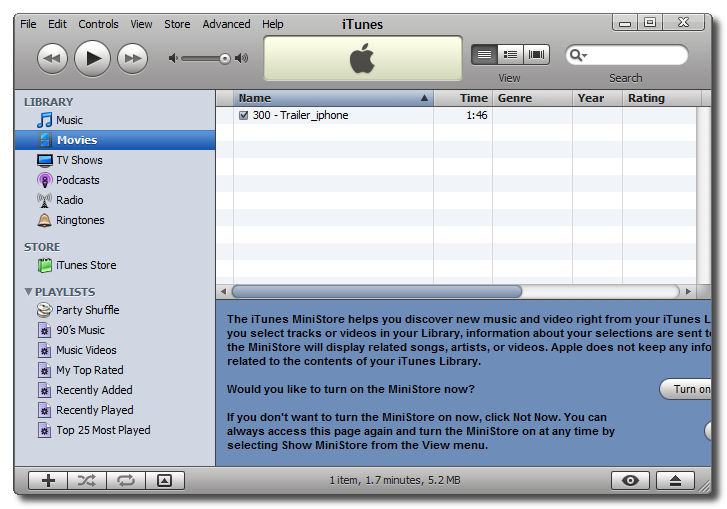
Drag the newly created video file into the iTunes window.
Step Nine
Your video file will then be added to the iTunes library.
Step Ten
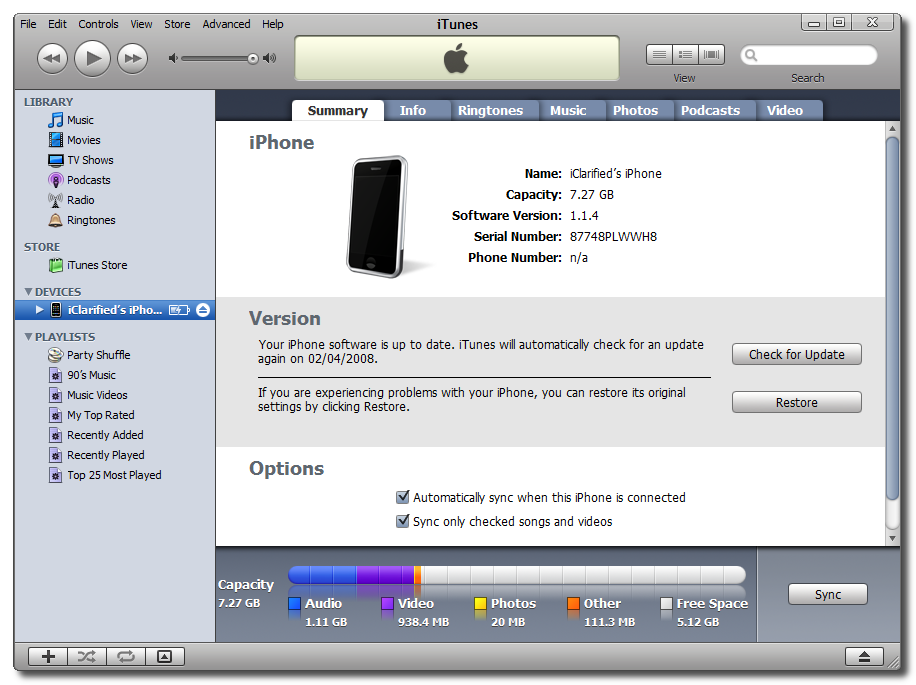
Connect your iPhone to the computer. iTunes will automatically detect it. Make sure you select the iPhone from the list on the left.
Step Eleven
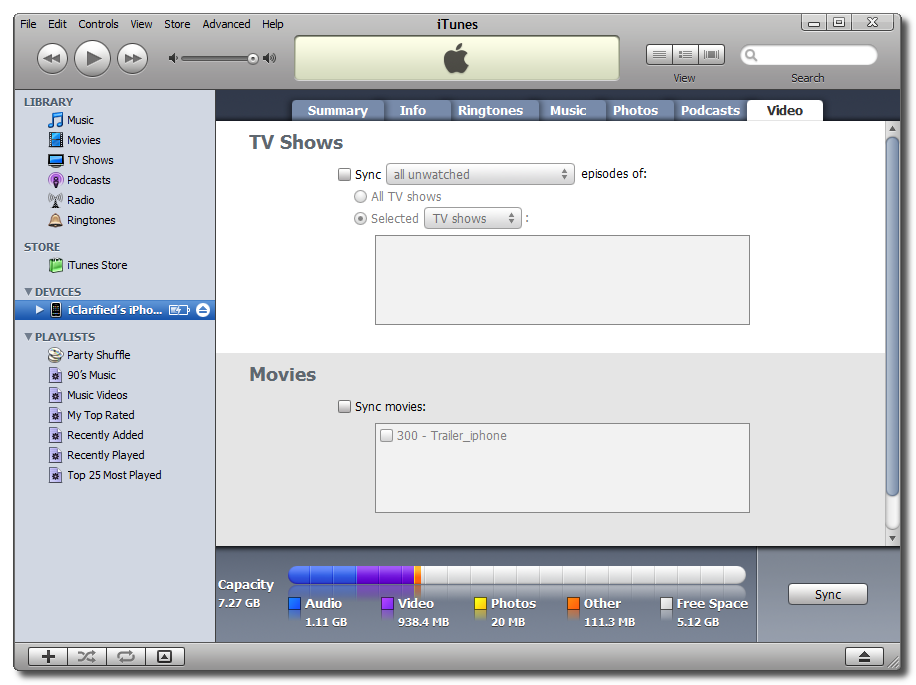
Click to select the Video tab.
Step Twelve
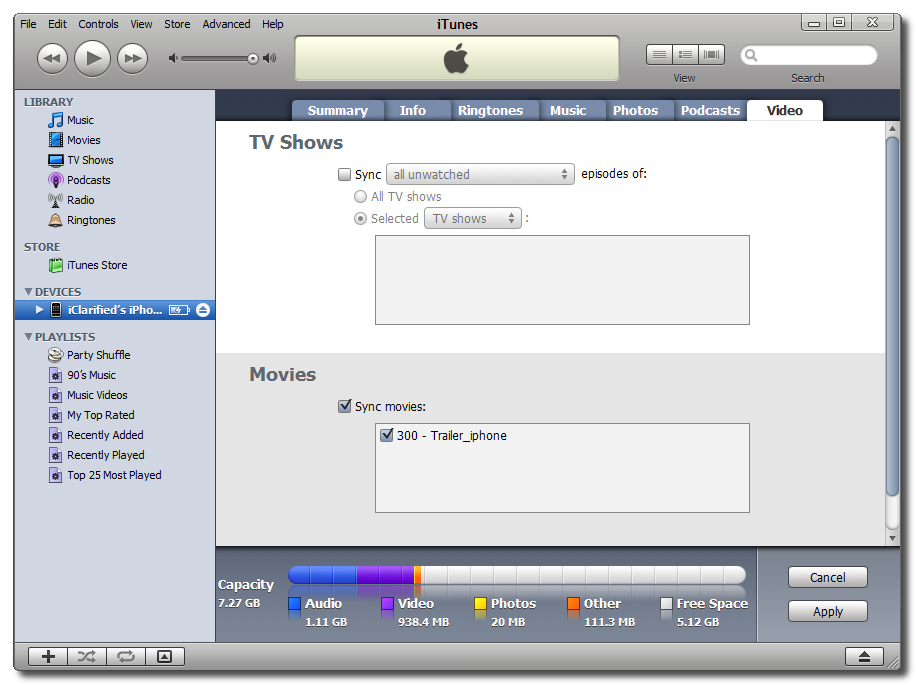
Check the Sync Movies checkbox, then check the box next to the movie you just imported into iTunes. Now click the Apply button at the bottom right hand corner to sync your video to the iPhone!
Rabu, 04 Maret 2009
How to Convert Video to iPhone Format Using Kvip (Windows)



How to Securely Erase Your iPhone Before Resale
These are instructions on how to securely erase your iPhone or iPod touch to prevent the recovery of private data.
 Watch the Video!
For your convenience this tutorial is available in video format also. Click the Watch It button to view the tutorial!
Step One
Launch iTunes by selecting its icon in the dock

Step Two
Connect your iPhone or iPod touch to the computer then select it from the list of devices on the left.
Step Three
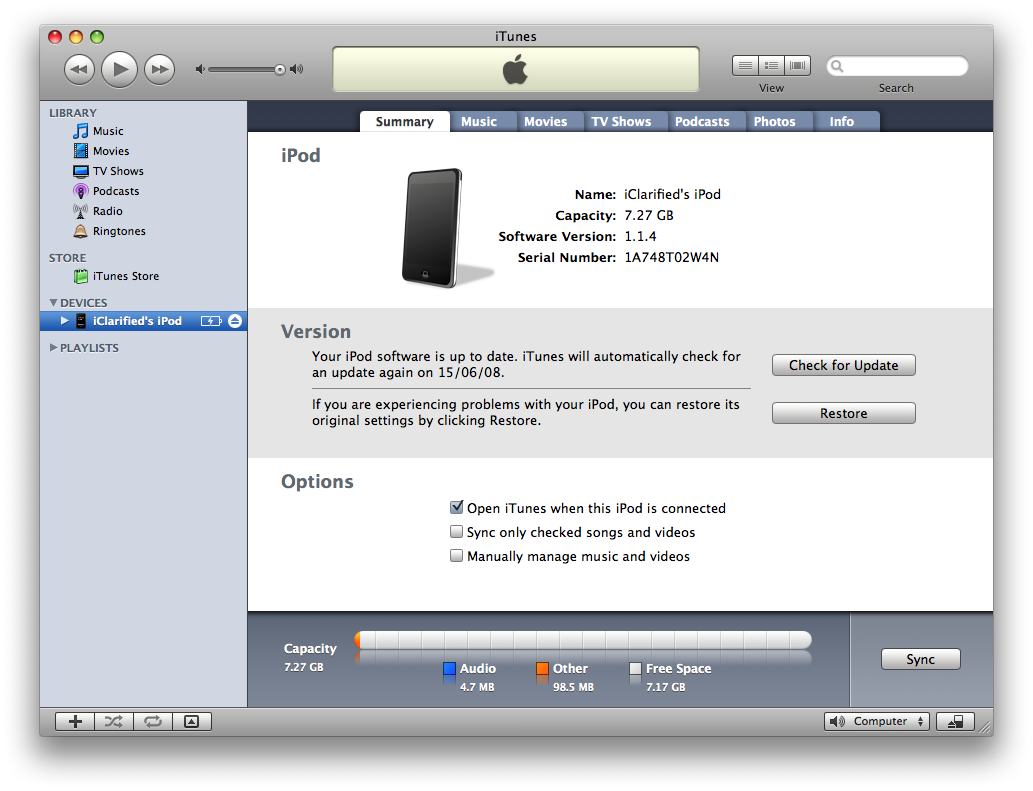
Click the Restore button in the Summary tab.

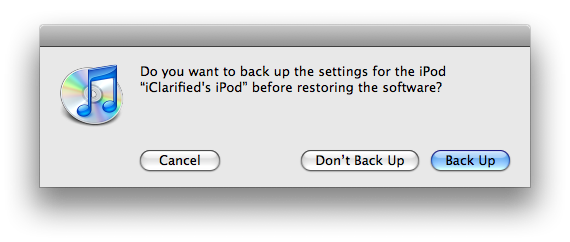
If asked to create a backup click Don't Back Up
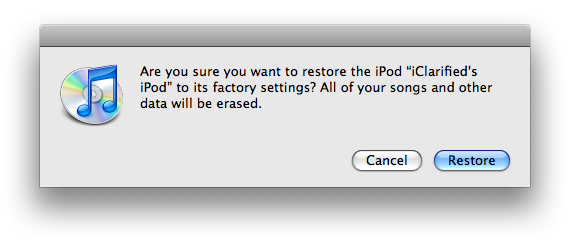
A popup window will appear asking you to confirm the restore. Click the Restore button.
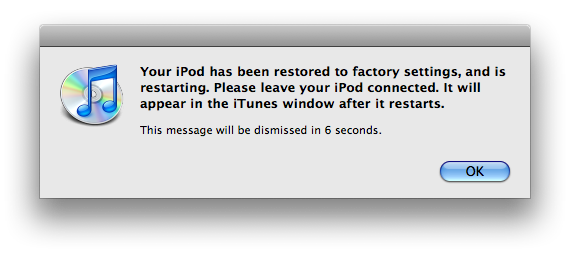
Once the Restore has complete a window will appear confirming that your iPhone, iPod has been restored to factory settings. Click the OK button.
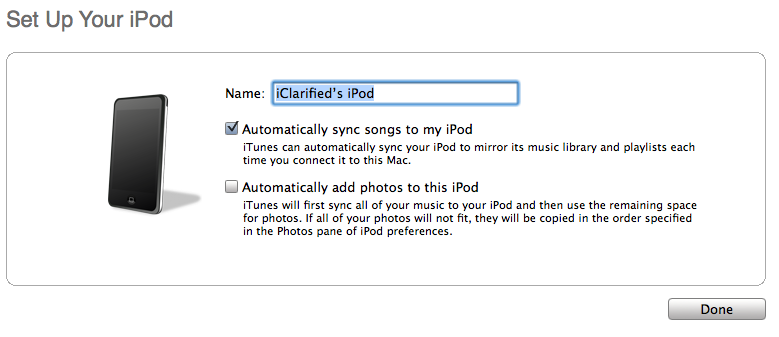
Now you will be asked to name your iPhone, iPod touch. Enter a new name then click the Done button.
Step Four
Now follow your desired method to jailbreak your iPhone. If you do not have a preferred method then use one of the many detailed on this site!
Windows: http://www.iclarified.com/entry/index.php?enid=849
Mac: http://www.iclarified.com/entry/index.php?enid=847
Step Five
Now you will need to install BSD Subsystem and SSH on your iPhone. You can do this by using these tutorials...
Install BSD Subsystem: http://www.iclarified.com/entry/index.php?enid=687
Install SSH: http://www.iclarified.com/entry/index.php?enid=1349
NOTE***: To make sure SSH connections do not terminate I would suggest setting Auto-Lock to Never in Settings:General:Auto-Lock.
Step Six
Download umount from here and save it to your Desktop.
Step Seven
Open a new Terminal window from your Applications:Utilities folder.

Step Eight
Enter the following command into your Terminal window:
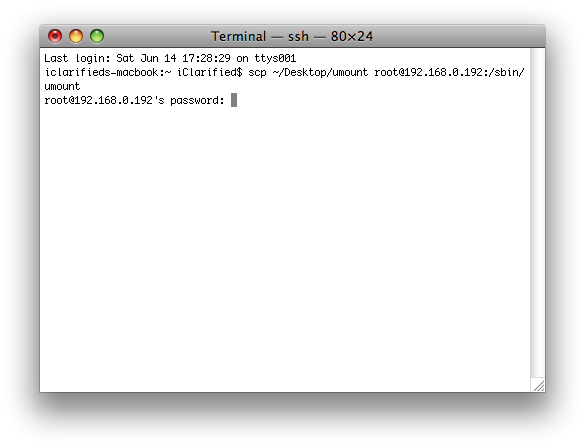
scp ~/Desktop/umount root@192.168.0.192:/sbin/umount
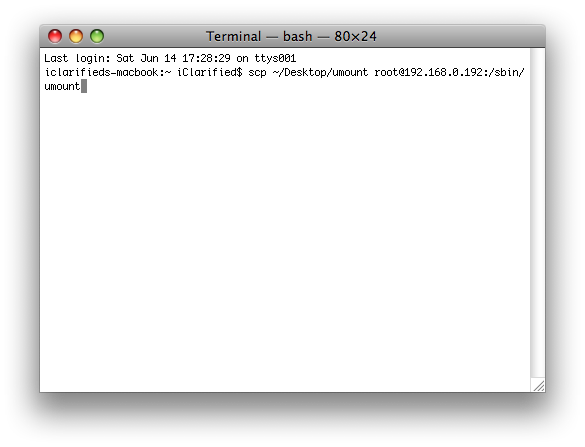
Don't forget to replace 192.168.0.192 with the IP Address of your iPhone.
If prompted for a password enter alpine.
Step Nine
Now lets SSH into the iPhone. Enter the following command into the Terminal window:
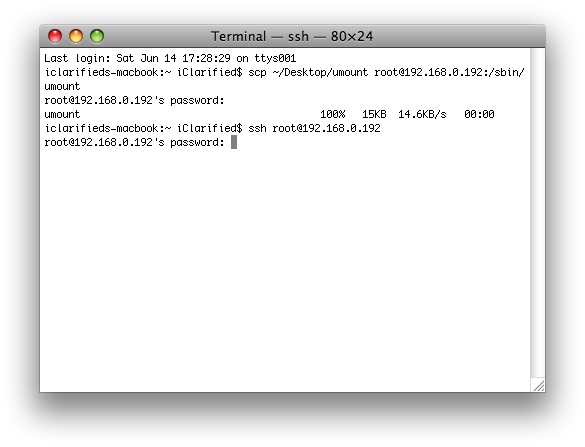
ssh root@192.168.0.192
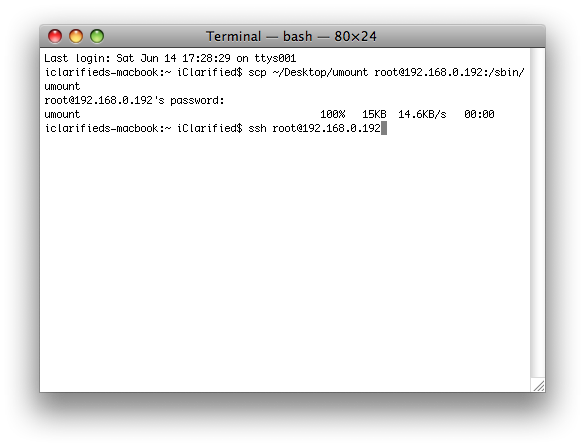
Don't forget to replace 192.168.0.192 with the IP Address of your iPhone.
If prompted for a password enter alpine.
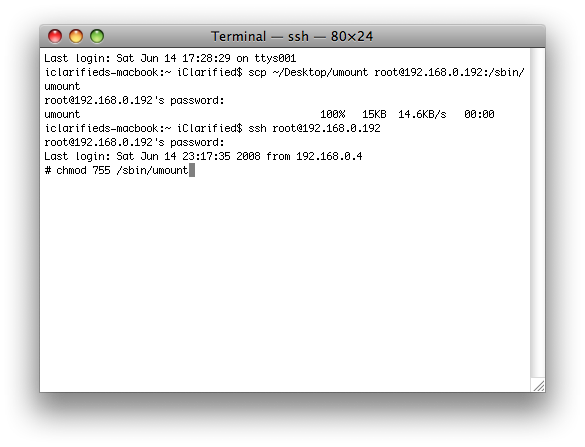
Step Ten
Now we need to give umount the executable permissions. Type the following into your Terminal window:
chmod 755 /sbin/umount
Step Eleven
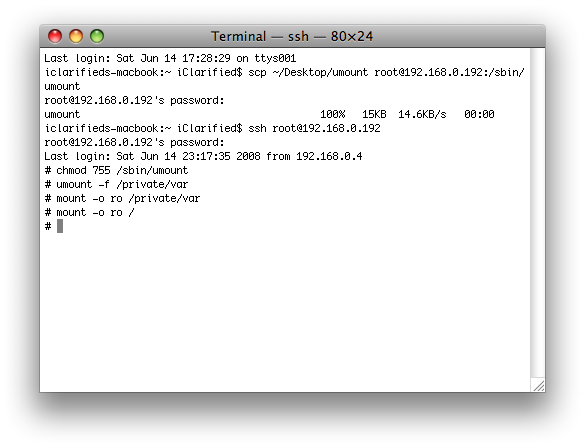
To force both mount points in to read only mode, enter the following commands into Terminal:
umount -f /private/var
mount -o ro /private/var
mount -o ro /
Step Twelve
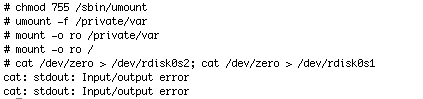
We now will wipe both partitions clean by copying /dev/zero over them. Enter the following commands into your Terminal window:
cat /dev/zero > /dev/rdisk0s2; cat /dev/zero > /dev/rdisk0s1

NOTE*: This will likely take up to an hour to complete! After completion your iPhone, iPod touch GUI will be unresponsive. This is expected.
Step Thirteen
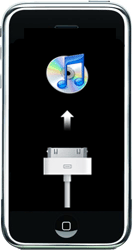
We will now place the iPhone, iPod touch into recovery mode. You can follow the instructions here for a detailed explanation. Though all you need to do is press the Sleep/Wake button and Home button until the iTunes logo and dock connector appear on the screen.
Step Fourteen
Follow Steps One through Three again to restore your iPhone, iPod touch. Your iPhone will now be securely erased and ready for resale.
THANKS***: This method was outlined by Jonathan A. Zdziarski. You can read his post on the matter here
How to Take iPhone 2.0 Screenshots
These are instructions on how to take screenshots using the built in iPhone 2.0 screenshot feature.
You must have iPhone 2.0 firmware installed to follow this tutorial.
Step One
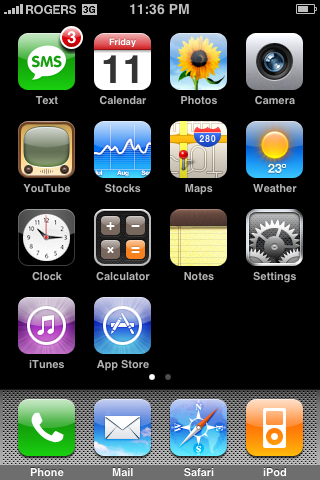
To take a screenshot simply hold down the Home button and press the Sleep/Wake button. You will notice the screen flash white.
Step Two
To view the screenshot you just took, press the Photos icon on your SpringBoard.
Step Three
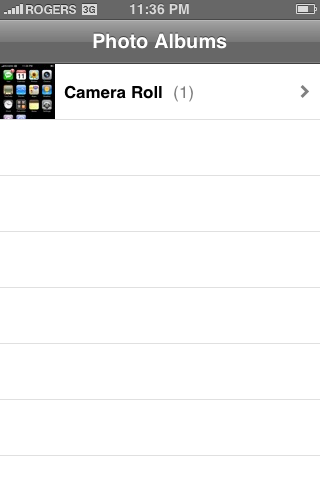
Press to select Camera Roll from the list of Photo Albums.
Step Four
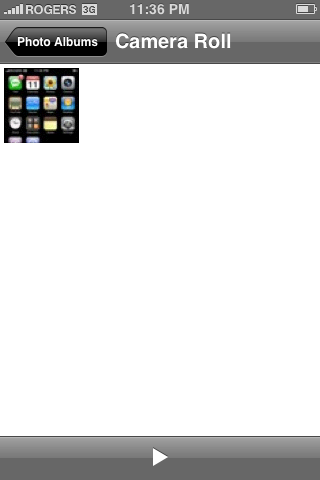
Press to select the small thumbnail of your screenshot.
Step Five
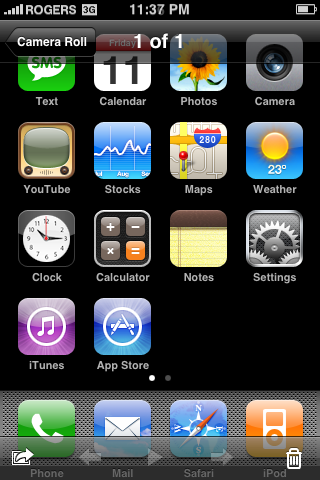
Now you can see your high quality iPhone screenshot. You can easily sync this to your computer just as you would with any other photo!
How to Send Files from One iPhone to Another
Step One
Follow our tutorial to install SendFile until Step Fourteen on the iPhone sending a file.
http://www.iclarified.com/entry/index.php?enid=518
Step Two
Follow our tutorial to install SendFile until Step Eight on the iPhone receiving the file.
http://www.iclarified.com/entry/index.php?enid=518
Step Three
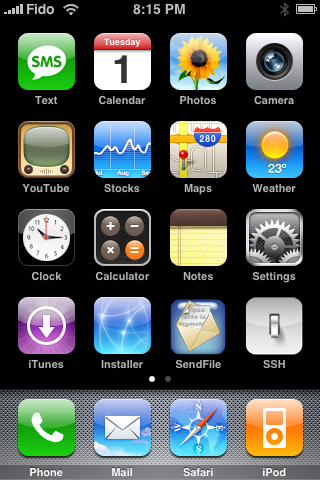
At this point we have SendFile installed on both iPhones and we have moved a file into /var/root/Media/Documents on the sending iPhone. Launch SendFile on both iPhones by pressing the Send File icon on the SpringBoard.
Step Four
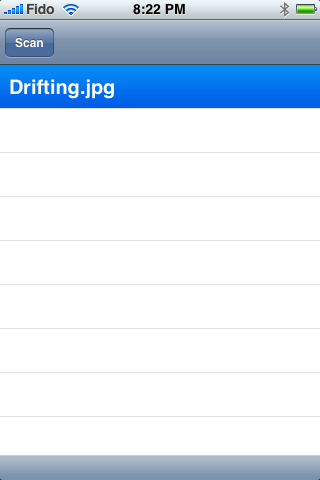
On the sending iPhone press the filename you would like to send.
Step Five
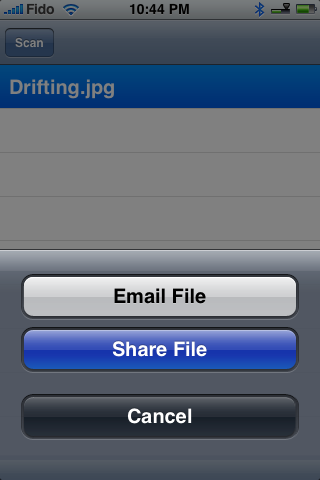
Then press the large Share File button that appears.
Step Six
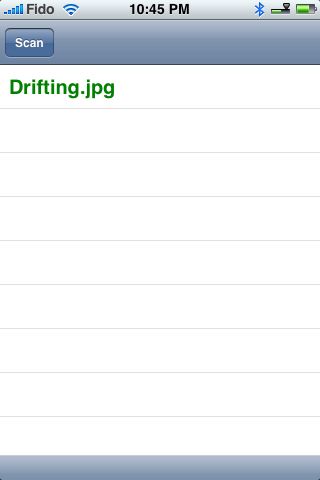
You will notice the file you selected turns green to show its sending.
Step Seven
On the receiving iPhone press the Scan button at the top left of the screen.
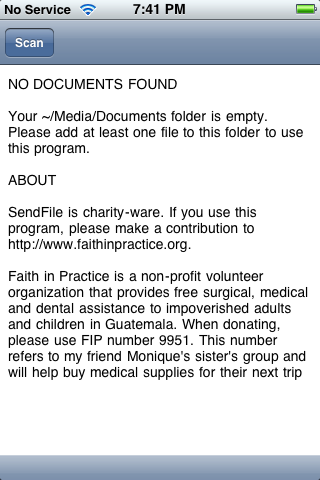
Step Eight
The iPhone will now go out and find the file and download it. It will appear in the list of files.
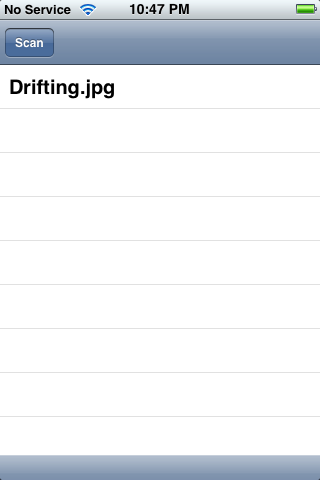
Thats it you should now have the file on your receiving iPhone.
A better way to install cracked App (.ipa) on the iPhone
Just follow the instructions below:
- Go to Cydia and uninstall the Safari Download Plugin if you had previously installed it
- Still in Cydia, add this source: http://cydia.hackulo.us
- Still in Cydia, install “Installous”
- Still in Cydia, install “OpenSSH”
- Quit Cydia
- Reboot your iPhone
- Connect to your iPhone with WinSPC (Windows) or Cyberduck (Mac OS X) (Using SSH Protocol)
- Make sure you have root privilege (Username: root ,Password: alpine)
- Navigate to “/Private/var/mobile/Library/Downloads” (Installous download folder)
- Copy “.ipa” files to this folder
- Run Installous
- At this time you see a list of applications that previously copied to the “Downloads” folder
- Install the applications
- Enjoy it !
But How you can find cracked applications (.ipa files) ?? Just do a torrent search!!
iPhone Volume boost for 2.1
2.1 volume boost pakage now availble through cydia (Author: iClarified)! The package may increase the overall volume output of your 2.1 iPhone!
But how it works??
This packages modifies following files and set all values to the maximum value of 1.0 (1.0000000)
- com.apple.celestial.plist
- RegionalVolumeLimits.plist
- SystemSoundMaximumVolume.plist
So advance iPhone users can do it themselves!! But I never do that because I don’t want any more volume !!!
Installous unable to decompress archive
According to several comments (Also wide range of Google searches!) I think iPhone users have problems with the new version of Installous (1.2, 1.2.1, 1.2.2)! (I try to find some way to Downgrade it to the 1.1 but i can’t find any way yet!)
Reported issues:
- Unable to decompress archive! (Main Problem)
- Permission errors
- iTunes removes installed apps
- [Updated] “1 broken packages” the following packages have unmet dependencies: Installous
- …
Solutions: (Exact solution not available yet)
- Reinstall Installous
- Make sure that you have correct .ipa file (Test it using WinZip, WinRar, etc)
- Make sure that Installous can access to the iPhone file system!!
- Install decompression tools from Cydia! (bzip2, gzip, zip , …)
- Try using another methods for installing .ipa files! (Highly Recommended, Updated!)
If any of these solutions works for you (or if you have better solutions) please leave comment here and describe your experiences!
Version 1.2 (Also 1.2.2) works fine for me!
Stay Tuned…MiPatch, The New Mobile installation Patch
[Updated] The new mobileinstallation patch for iPhone OS 2.2 now available here.
MiPatch (By Hackulo.us) patches the MobileInstallation file in iPhone/iPod Touch in order to bypass genuine check of ipa files! So you can install cracked ipa files using iTunes. An other version of this patch available here.
Installing this package may solve the Installous problem (Not sure)! please test it and report the results here!
[Updated] Read our STEP BY STEP guide for installing apps on your iPhone!
Stay Tuned…

iPhone Theme Generator
I found a new site (http://www.iphonethemegenerator.com/) named iPhone Theme Generator!!! It may can create theme for you iPhone (Actually not known!)
IphoneThemeGenerator.com What is it?
iPhone Theme Generator does exactly what the name is telling you, Generate online iPhone themes.How does it work?
Just choose your wallpaper, dock and statusbar from the library of upload your own bitmaps.Also choose the icons styles you like.How do I compile my theme?
Easy, just hit the ” Compile Theme ” and grab your theme.What must I do with the theme files?
Just upload it to the default theme location: var/root/library/summerboard/themes.
How does it work?!!???!!!
The new iPhone OS (2.2.1) available via iTunes
iPhone OS 2.2.1 is available through iTunes.

Is it safe to update to this version ?
- iPhone 3G users
- NOT SAFE (DON’T UPDATE)
- Read This
- iPhone 2G / iPod Touch users
- Update or restore to 2.2.1
- Jailbreak using QuickPWN or pwnageTool (Mac only)

- PwnageTool 2.2.5 for Mac OSX
- SHA1 Sum - 8fe2f20c00f48b37d8262d6872a12166c6e165ba
- QuickPwn 2.2.5 for Mac OSX
- SHA1 Sum - 2f1353242ef10dc408e95786643e497fcd04e4ea
- QuickPwn 2.2.5 for Windows
- SHA1 Sum - d158c9d2e24e2ad429b7681f98b21444b4a3867f
- QuickPwn 2.2.5-2 for Windows
- SHA1 Sum - 82aae63218316af42e4fa20f8c69d9eb4fe9d4ee
You can find a good Tutorial for PwnageTool 2.2.5 here.
What happens to ipa files & mobileinstallation patch?
After updating to 2.2.1 you should install an app from appstore again for getting recent applications work. Also you may need to update mobileinstallation patch to prevent iTunes form uninstalling Cracked apps.
Things to do if you are running Mac OSX 10.5.6 .
As noted previously OS X 10.5.6 introduced a bug that affected the use of DFU mode. with some Macs. There have been previously published hacks and techniques to fix this, but here is another method that can be used to easily restore functionality.
- You will need an account with ADC (Apple Developer Connection) this is free and takes a few minutes to sign up, you should read the terms and conditions carefully and you should only sign up if you are thinking of developing applications in the future - http://developer.apple.com/mac/
- Download the disk image “IOUSBFamily Log release for Mac OS X 10.5.5 Build 9F33” (yes, that is a “5” in 10.5.5 - this is a developer debug package of the USB kernel extension).
- Install IOUSBFamily-315.4.1.pkg from within the disk image
- Reboot your system!
What Dev-Team said ?
There is an iPhone and iPod update available in iTunes - it is numbered 2.2.1 (5H11a).
Please DO NOT update. We will investigate and report back to you ASAP.
- GOLDEN RULE: If you have a 3G iPhone running 2.2 firmware and you want to keep your ability to use yellowns0w (or the option to use it in the future) do NOT use QuickPwn, and do not use the official ipsw or the iTunes update process without using PwnageTool.
- Yellowsn0w will NOT work with the baseband version (02.30.03) that is present in the recent 2.2.1 update - you will need to create a custom ipsw that will allow you to update safely without affecting the baseband.
- Please read all parts of this post before downloading and using these tools.
- Read items 1, 2 and 3 again and again.
- At the bottom of this post are the bittorrent files for the latest versions of PwnageTool and QuickPwn.
- These apps are suitable for the recent 2.2.1 release.
- The Yellowsn0w version has been updated to 0.9.7. Yellowsn0w is available from Cydia or Installer - this version allows compatibility with pwned 2.2.1 system (not baseband) - again - remember 0.9.7 yellowsn0w DOES NOT WORK WITH 2.2.1 (02.30.03) directly - you need to be running a ‘pwned’ version of 2.2.1 which doesn’t upgrade the baseband.
- Users of OS X 10.5.6 will be unable to use DFU mode correctly, please see the note here to easily fix this issue.
What’s new in this release?
- Improved general stability of Safari
- Fixed issue where some images saved from Mail do not display correctly in the Camera Roll
- iPod Touch Only
- Fixed issue that caused some Apple Lossless (ALAC) audio files to skip during playback
Release information
- Baseband version:
- 02.30.03 (iPhone 3G)
- Build:
- 5H11 (iPhone, iPod Touch)
- 5H11a (iPod Touch 2nd Gen)
Firmware download links
Combining iPhone/Ipod Touch Themes
Some times you find a new theme for iPhone but you want to use only one part of this theme (e.g. LockScreen) or you may want to use combination of diffrent themes!
You can create your theme combination as easy as 1,2,3!
Here are the few instructions to extract only the desired customizations:
- Install the complete package from Cydia
- Connect to your iPhone via SSH
- Go to the package folder /private/var/stash/Themes.8tnMPs/ (e.g. Rabbids.theme) and rename it
- Keep only the files you are interested in, according to the following table
- Launch Winterboard!
- the result of your work will appear under the new name (e.g. My Rabbids Lockscreen).
- just select it and exit Winterboard
- that’s all! Enjoy new theme!
Lockscreen
Files: \LockBackground.png
Springboard
Folder: \Icons\
Files: \Wallpaper.png
\Dock.png
Dialer
Folder: \Folders\MobilePhone.app\
Notes
Folder: \Folders\MobileNotes.app\
Battery
Files: \Bundles\com.apple.springboard\BatteryBG_*.png
Weather
Folder: \Folders\Weather.app\
SMS Bubbles
Folder: \Bundles\com.apple.MobileSMS\
Slider
Folders: \Bundles\com.apple.springboard\*.lproj\
Files: \Bundles\com.apple.TelephonyUI\bottombarknobgray.png
\Bundles\com.apple.TelephonyUI\bottombarknobgreen.png
\Bundles\com.apple.TelephonyUI\bottombarknobred.png
\Bundles\com.apple.TelephonyUI\bottombarbkgnd.png
\Bundles\com.apple.TelephonyUI\bottombarbkgndlock.png
iPod
Folder: \Folders\MobileMusicPlayer.app\
Safari
Folder: \Folders\MobileSafari.app\
Calculator
Folder: \Bundles\com.apple.calculator\


 Postingan

